How to integrate the Synology VAAI Plugin into the vLCM Image?

I had a customer support case recently where the customer was struggling with updating a vSphere cluster. The customer was already using the vSphere Lifecycle Manager (vLCM), but the composed image always returned the error that the hosts were not compatible. So he asked for help.

We knew the installed hardware, we knew the installed (and targeted) ESXi version, and we also knew the currently installed and targeted version of the vendor addon, too. But we were both a bit perplexed. Until we took a closer look at one of the “incompatible” hosts and the error message that revealed the cause of this incompatibility.

The error message told us that vLCM should obviously downgrade something, but couldn’t. Thanks to the listing of what’s currently on the host and what’s in the image of the desired state, we could find out what the issue is. And there were some “components” that differed in the versions. And we saw that the ESXi version was fine, and the image is more up-to-date than the host, and the same for the vendor addon. But we saw that two or three drivers were a little above on the host than in the image. We couldn’t explain this. But with the possibility of manually adding “components” to an image, we were able to fix that.

vSphere Lifecycle Manager (vLCM) shows an error
Source: knowledge.broadcom.com

Long story short, in the vLCM image, you cannot only choose the desired ESXi version and vendor addon, and if you have the hardware support manager (HSM) installed, the latest server firmware. But you can also add specific drivers and updates manually to the image. And you can even upload some updates to the vLCM.

And exactly the last step, uploading a plugin and manually adding such “components” is the topic of this blog post. Let’s dive into it.

Disclaimer

The following steps are related to hardware and software, which may or may not be on the hardware compatibility list (HCL). I’m showing screenshots from my homelab, where I don’t care much for compatibility. It is more kind of “the main thing is that it (somehow) runs and works and does what I want.”

Please use it at your own risk, and probably not in production, except the vendor and / or Broadcom have it on the compatibility list and everything has been checked for being properly supported.

How can I upload a plugin to vLCM?

Well, I’m glad you’ve asked. That’s pretty simple. But before we move on, you may know what plugin I’m using for my homelab and as an example for this blog post. It is the Synology VAAI plugin. You get more information on how to install the plugin (the manual approach), and also the download link, from the Synology website here.

But what is VAAI?

VAAI, short for “vStorage APIs for Array Integration,” is a feature introduced in ESXi that provides hardware acceleration functionality. It enables your host to offload specific virtual machine and storage management operations to compliant storage hardware. With the storage hardware assistance, your host performs these operations faster and consumes less CPU, memory, and storage fabric bandwidth. (Source: knowledge.broadcom.com – FAQ for vStorage APIs for Array Integration).

And now, let’s continue. I assume that you’re already logged in to the vCenter web client.

  1. In the vSphere web client, click the burger menu in the top-left corner. Then, click the “Lifecycle Manager” entry.
  2. On the top menu, click “ACTIONS“, then “Import Updates

    Notice: it doesn’t matter on which tab you’re on in the Lifecycle Manager; you can import updates from any tab.
  3. Next, click “BROWSE” to open the file dialog, and search for the plugin you’d like to upload
  4. Next, click “IMPORT” to start the upload of the plugin to the vLCM library

And we’re done for the first part, we successfully uploaded a plugin to the vLCM library. We continue now with using this plugin in a vLCM image.

How to add a plugin to a vLCM image?

  1. As we’d like to create an image with this plugin included, navigate to the “Image Library” tab, and click “CREATE IMAGE
  2. We start by providing an image name and choosing the desired ESXi version.
  3. To add the recently uploaded plugin, you may have to click “SHOW DETAILS” first, and then click “ADD COMPONENTS
  4. In the following dialog box, you can search for the plugin. Just click the filter icon in the “Component Name” column and enter the plugin name
  5. Now select the plugin (check the box in front of it), then click “SELECT” in the lower-right corner
  6. We can now see the added plugin in the list of components. Next, click “SAVE” and you’re done with creating the image

You can now move on and assign this image to your cluster and start updating the hosts. Have fun!

Storage performance upgrade – and how to make use of Vmknic binding

It’s been a while now (exactly two years and one month), since I bought my last Synology NAS, both for homelab and personal/private usage. Why did I buy a new NAS? There are some requirements that my new NAS had to fulfill:

  • Capable of 10 Gigabit Ethernet (integrated or with an addon card)
  • Enough slots for disks (at least five)
  • Two NVMe slots for using NVMe SSDs as read/write cache (integrated or with an addon card)
  • Can be used for homelab storage, as well as backup storage for home computers, laptops, etc.

When looking for that one NAS that could handle all of the above, I stumbled across the Synology DS1621xs+. Synology launched it in September 2020, and I ordered it about two months later.

Some of the technical specifications of the NAS:

  • It has 2 x M.2 2280 NVMe slots
  • It comes with 8 GB DDR4 ECC SODIMM (expandable up to 32 GB, and yes I upgraded to 32 GB)
  • It is equipped with an Intel Xeon D-1527 4-core 2.2 GHz CPU that has a Turbo Boost up to 2.7 GHz
  • In terms of connectivity, there are two 1 GbE and one 10 GbE RJ-45 ports
  • If you fancy, you could install some PICe card (the NAS has one 8-lane x8 slot), but I don’t know why or what
  • And you can install up to six 3.5″ or 2.5″ drives

So that’s the basics covered. Let’s get back to the topic.

Read more

How to create custom (storage) reports on your Synology NAS

The vExperts had the chance to attend an exclusive online session recently together with Synology. The topic was “Flexible VM backup and recovery solutions with Synology”. Josue Guzman, Technical Account Manager at Synology, showed us how to set up and use the VM backup solution. He demoed also the whole backup and restore process. And especially the instant restore option, where the Synology NAS mounts itself as an NFS datastore into your ESXi host was awesome.

Many thanks to Corey Romero and the vExpert team for organizing all these cool sessions!

But I’m not going to recap the session here. I just want to pick up the thread because there is a not-inconsiderable amount of space required with backup. And if you also have specific RTO and RPO that have to hold data for a certain period of time, then the storage requirement can be quite large.

And that’s exactly the thread I want to pick up. When you’re working with Synology NAS systems, you may know how cumbersome it sometimes is to get the size of the various (shared) folders you have on your NAS. Sure, you can do “right-click => select Properties” on every folder, note it down somewhere, and then you can add all the values together. But who wants that?

But there is a much nicer and more elegant way to get the folder size. And at the end, you even see colored pie charts. Well, are you curious now?

Read more

An easy way to quickly migrate a VMware VM to Synology VMM

When it comes to virtualization, I’m working with VMware products in my homelab, alongside (hardware) products from other manufacturers. But some special circumstances made a special solution to a problem necessary. Due to a month of military duty, when I was at home only for the weekend, I shut down my homelab. Not also due to this fact, but also because I’m currently building my own customized rack, where I will install my homelab hardware. Be sure to check my blog frequently to get more information about the rack, as I will blog about it soon!

What’s the reason for this migration?

I’m using Ubiquiti hardware for my networking (lab switches, home networking, including wireless), and also a Pi-Hole as my ad-blocker. These are the only “business-critical” services in my home network. And they were running on my homelab. But what should I do when I shut down everything? Well, VMware Workstation to the rescue! I’m (actually, I was) running an ESXi on VMware Workstation on my gaming computer. This ESXi server was managed with vCenter as a replication target for Veeam Backup and Replication. Quickly migrate the VMs to that virtual ESXi host, and that’s it. But what when I accidentally shut down this PC? Or I want to shut it down? I need another solution which is more like 24/7!

What’s the solution?

That made me think about Synology. I knew that at least some Synology NAS systems can run virtual workloads directly, either as a virtual machine or within Docker. I didn’t want to go with Docker because of the lack of knowledge, and I have only limited system resources on that NAS box. So it will be two VMs running on my Synology box! But how?

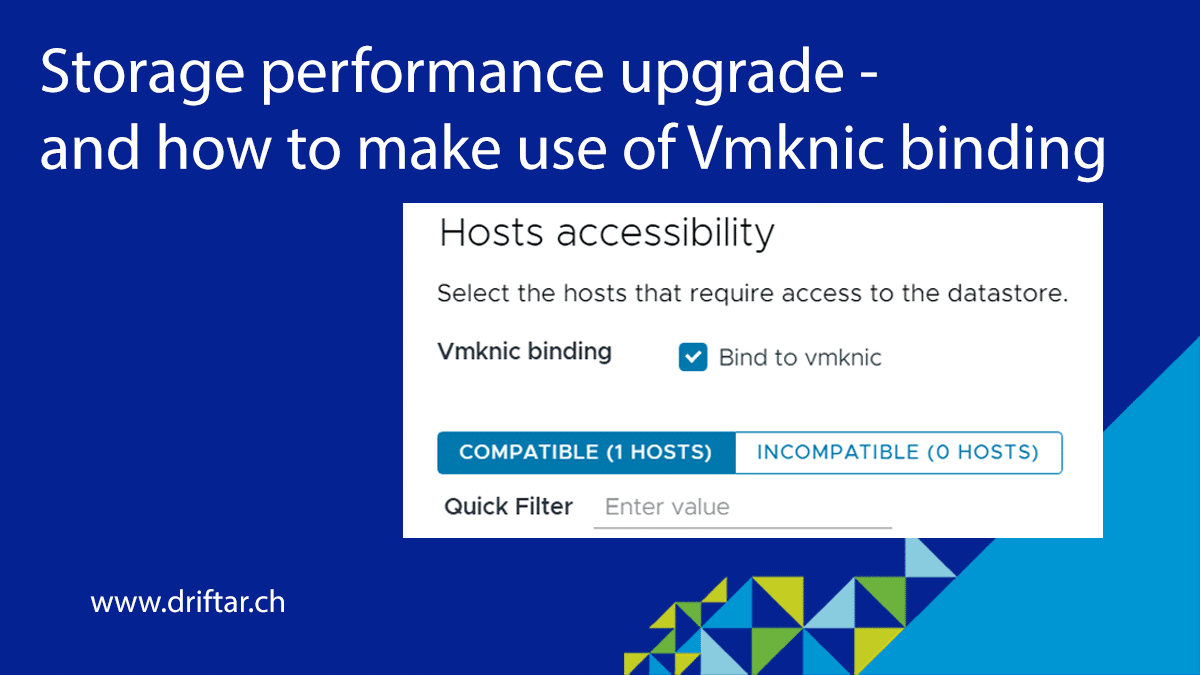
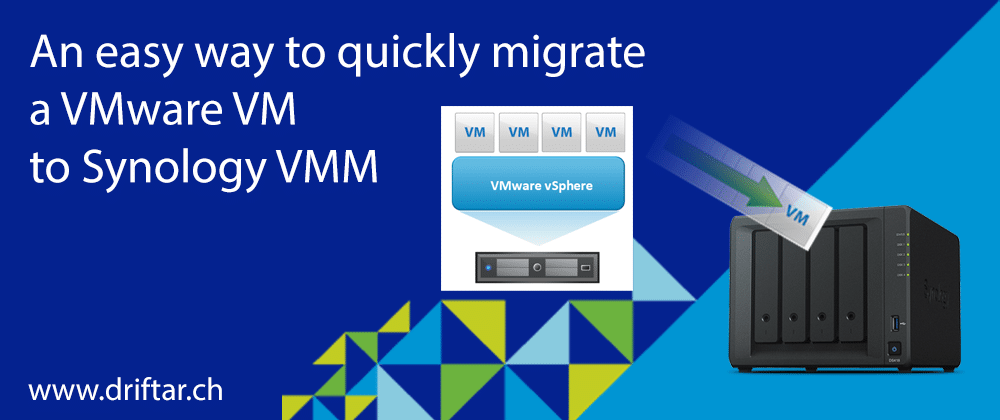
You can’t just vmotion your VMware VM to Synology VMM (Virtual Machine Manager). You can export the VMDK files or create an OVF, which you then import into Synology VMM. But that took to long, somehow (in certain circumstances I can be impatient …).

This blog post will show you how you can easily backup your VMware VMs to a Synology box, with their own toolset, and restore it directly into Synology VMM. It might come in handy, in case you’re searching also for a nifty solution to run a Pi-Hole or a Ubiquiti controller. Or some other small VMs.

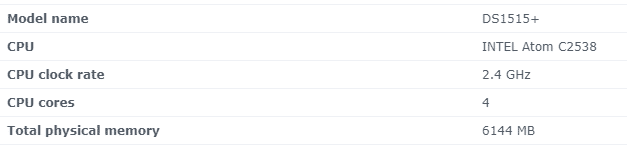
To be honest, the Synology box isn’t a Ferrari, or a Fright Liner in terms of performance and / or capacity. Such a NAS is always somehow limited in CPU resources and memory. In my case, I was happy that I maxed-out the memory when I initially bought the NAS box. My current NAS looks like this:

You can see, there are not many resources, but it should be fine for some tiny Linux VM. A domain controller can even run on it if the resources are used sparingly. But don’t expect too much… And let’s dive into the topic now.

Read more

Synology now with backup for Office 365

Long time no hear, and I’m really sorry for that. It was a busy time, with a new job, huge project and also military duty in between. But now things are calming down, and so do I. And I’ve got some time for a new blog post.

Recently i stumbled across a newsletter from Synology. They now have a backup tool for Office 365 available which is free of costs for 10 users. Extra license packs can be purchased for adding and renewing additional licenses. That doesn’t sound so bad. But wait. Office 365 is in the cloud, doesn’t Microsoft back it up so that I don’t have to worry about? Well, long story short, NO. There is some retention like deleted items and stuff, and you can modify specific settings. But backing up Office 365 data is all in your own responsibility. There are various backup solutions like Veeam Backup for Office 365 which work absolutely great, and also the recently announced solution from Synology which I’m writing about today. Let’s look at it a little closer.

Unfortunately not every Synolgy NAS system is supported, so please have a look at the list here if your devices is on it or not. Lucky me, i bought a new NAS for my vSphere homelab some months ago which fits perfectly for this test setup.

Supported NAS systems

  • 18 series:FS1018, RS3618xs, RS818RP+, RS818+, RS2818RP+, RS2418RP+, RS2418+, DS3018xs, DS418play, DS918+, DS718+, DS218+, DS1618+
  • 17 series:FS3017, FS2017, RS3617xs, RS3617RPxs, RS4017xs+, RS3617xs+, RS18017xs+, DS3617xs, DS1817+, DS1517+
  • 16 series:RS2416RP+, RS2416+, RS18016xs+, DS416play, DS916+, DS716+II, DS716+, DS216+II, DS216+
  • 15 series:RS815RP+, RS815+, RC18015xs+, DS3615xs, DS415+, DS2415+, DS1815+, DS1515+
  • 14 series:RS3614xs, RS3614RPxs, RS814RP+, RS814+, RS3614xs+, RS2414RP+, RS2414+
  • 13 series:RS3413xs+, RS10613xs+, DS713+, DS2413+, DS1813+, DS1513+
  • 12 series:RS3412xs, RS3412RPxs, RS812RP+, RS812+, RS2212RP+, RS2212+, DS3612xs, DS712+, DS412+, DS1812+, DS1512+
  • 11 series:RS3411xs, RS3411RPxs, RS2211RP+, RS2211+, DS3611xs, DS411+II, DS411+, DS2411+, DS1511+

More information about Active Backup for Office 365

Synology has plenty of information about Active Backup for Office 365 on their website.

Some of the features:

  • Protection of mail, calendar, contacts, OneDrive
  • With Active Backup for Office 365 Portal enabled, both employees and admins can easily locate items for restoration and restore/export them with simple clicks
  • Mail/calendar attachments (if stored in Btrfs volumes) and OneDrive files that contain identical content will only be stored to Synology NAS once, which saves storage space
  • Files stored in Btrfs volumes on Synology NAS can be deduplicated with previous versions, minimizing the storage space required

But now let’s talk tech and let’s dive into the setup and configuration of Active Backup for Office 365.

Read more