Microsoft Active Directory – Desktop Shortcuts with Group Policy

A really cool feature in Microsoft Active Directory is the  Group Policy (or Group Policies in general). With Group Policies you can install (small) software packages, set the Internet Explorer start page, set wallpapers, execute scripts on user or computer security context and many things more. You can also deploy specific desktop icons for a user or a user group. Hence this blog post will show you how you deploy simple desktop shortcuts to a users desktop.

The group policy

If you have some specific applications in your company (for example a simple timesheet application) which your users should use, then you can create a group policy or a group policy preference respectively to deploy this desktop shortcut.

  1. In Group Policy Management, create a new group policy object (GPO) in the “Group Policy Objects” folder.
  2. Right click this newly created GPO and select “Edit…”.
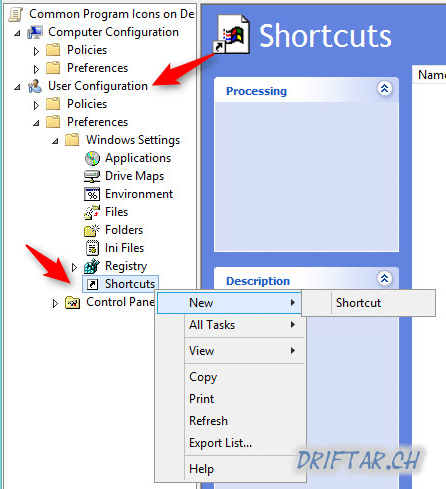
  3. Navigate to “User Configuration => Preferences => Windows Settings => Desktop”
  4. Right click the “Desktop” object and select “New => Shortcut”
    Group Policy - Shortcuts

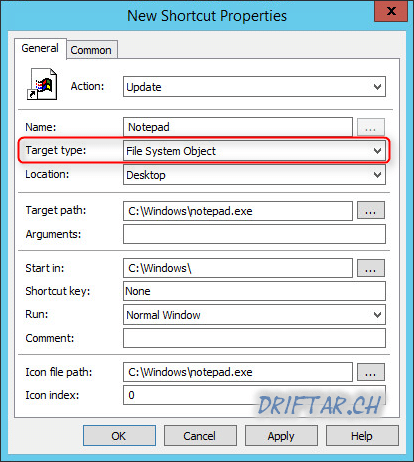
  5. Now set all the configuration details of your application shortcut in the next dialog box.
    Group Policy - Shortcut Target Type

    Note: Please be aware of the “Target type” setting. If the shortcut has to be an application shortcut, you have to choose “File System Object”. As default it’s set to “URL” and thus creates only a shortcut for a website. Therefore if your user wants to open this shortcut, Internet Explorer (or the default browser) opens with a “cannot display this website” message instead of the application.

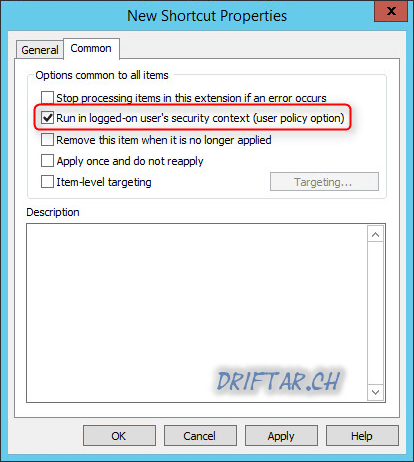
  6. On the “Common” tab check if this group policy preference should run in logged-on user’s security context or not.
    Group Policy - Shortcuts Security Context

    Note: If you set the „Location“ to „Desktop“ then you should make sure on the „Common“ tab the check box „run in logged-on user’s security context“ is set, because the shortcut will be published on the users own desktop. If you whish to deploy a shortcut to the „All Users“ profile then you have to set the target to „All Users Desktop“ and also uncheck the box to run this group policy preference in logged-on user’s security context. Usually a normal user doesn’t have access to all users profile, but the system account, which runs this group policy preference, has access to it.

  7. Now click Apply / OK and close this dialog box.

As the last step, back in GPO Management, link the created GPO with the Organizational Unit in which your users reside.

Now your users have only to restart the computer or do a single log-off log-on. So they will receive the newly created desktop shortcut.

VMware vSphere – How to script vMotion for your VMs

vMotion Script

VMware vMotion is a pretty good feature regarding the availability and load balancing in your vSphere environment. Today i created a vMotion script to help me create a backup with a backup software.

As so many times my blog posts are the result of a problem i had and for which i needed a solution. It shouldn’t be different today. I worked in my vSphere homelab. I created some virtual machines and installed my backup software of choice. My idea was to have a backup before doing any work with the VMs, just in case i screw it up. So i can easily go back to a known good state of the VM and try again. But this task wasn’t so easy.

As a vExpert, VMCE, MVP, Trainer or many other different tech people you can request a NFR license key for Veeam Availability Suite. So did i. The NFR key was delivered quickly to my mailbox, and was even faster installed in Veeam. But there was a catch. At least my NFR license is limited to two sockets, but with no limits for protected VMs, and it comes with a full 1-year retention period, instead of just 30 days as the regular trial.

So i had to deal with the fact that only one host (i’ve got three hosts in my lab with two sockets each) is protected by Veeam. This limitation woke the hunter in me because i had to find a solution. My goal was to backup all my VMs but with only two licensed sockets. The approach I chose was to set vSphere DRS to manual, then do a vMotion of all VMs to the host which helds the Veeam license, doing a backup and set DRS back to fully automated after backup. If you are working with ressource pools you shouldn’t disable DRS, because that results in removing the ressource pools. But there is a workaround for that too. Instead of creating a new problem i did the easy way and just set DRS to manual.

How to get the vMotion script

If you’re familiar with GitHub you can download my script from there:

https://github.com/driftar/vSphere

For any other user i’ll provide the script directly here:

[code lang=”powershell” gutter=”true”]
# .SYNOPSIS
# This script will start a vMotion of all virtual machines on a specified datastore to a specified ESXi host.
# If you are working with a backup software which is licensed to a specific host, # this will probably help you.
# Only recommended in smaller environments or if you have enough ressources on this host.

# .DESCRIPTION
# The script loads a PSSnapin; it sets some PowerCLI options; it connects to your vCenter Server with the given credentials;
# it gets all your VMs in an array; it starts then a Host vMotion of all the VMs in the array to a specified ESXi host.

# .NOTES
# File Name : pre-backup.ps1
# Version: : 1.0
# Author : Karl Widmer (info@)
# Prerequisite : PowerShell V2 over Vista and upper / VMware PowerCLI 6
# Tested on: : Windows Server 2012 R2
# with PowerCLI : PowerCLI 6.3 Release 1 build 3737840
# with PowerShell: 4.0
# Copyright 2016 – Karl Widmer / driftar’s Blog (www.)

# .LINK
# Script posted over: https://www.driftar.ch

# Load PowerCLI cmdlets
Add-PSSnapin VMware.VimAutomation.Core -ErrorAction "SilentlyContinue"

# Set PowerCLI behaviour regarding invalid certificates and deprecation warnings
Set-PowerCLIConfiguration -InvalidCertificateAction ignore -DisplayDeprecationWarnings:$false -confirm:$false

# Define vCenter User and target Datastore
$vcHost = ‘vcenter.domain.com’
$vcUser = ‘administrator@domain.com’
$vcPass = ‘password’
$datastore = ‘your_datastore’
$cluster = ‘your_cluster’
$targetHost = Get-VMHost -Name yourhost.domain.com

# Connect to vCenter
Connect-VIServer $vcHost -User $vcUser -Password $vcPass

# Get VMs (pass array of VMs to $VMs, for example ‘get-datastore test | get-vm’)
$VMs = Get-Datastore $datastore | get-vm

# Get Cluster information to set DRS to Manual for backup window
Set-Cluster $cluster -DrsAutomationLevel Manual -Confirm:$false

Foreach($vm in $vms) {
Write-Host ("Start Host vMotion for VM ‘" + $VM.Name + "’")

Move-VM -VM (Get-VM -Name $vm) -Destination (Get-Vmhost $targethost) -RunAsync

Write-Host ("Waiting…")

Write-Host ("Host vMotion for VM ‘" + $VM.Name + "’ finished")
}

# This last script step should probably be executed in a post-backup script step.
# It sets the DRS automation level back to fully automated. Your VMs will then probably load-balance on your hosts.

# Set DRS on cluster back to FullyAutomated after backup window
Set-Cluster $cluster -DrsAutomationLevel FullyAutomated -Confirm:$false
[/code]

Update 07.11.2016

After updating my ESXi hosts to 6.0.0 Build 4510822 my script stopped working. So i simplified the script and released version 2.0.

VMware Workstation – Save login information for remote host

This post is gona be a short one. It was once again a problem for which I needed a solution. Today i was working in my vSphere homelab. I’ve set up some more virtual machines, installed my availability software of choice and did some reading. If you are a VMware Workstation user, then you probably know the feature to connect to a remote server, like, for example a vCenter Server. That’s a pretty handy feature which i really like. You can connect to your lab environment and you can access all your VMs directly and easy, without any remote desktop and stuff.

One thing about this feature was quite annoying for me. Everytime when i connected to my lab environment i had to enter my credentials. It didn’t bother me very much, it was just annoying. So i searched for more information but there wasn’t much. Then I found a VMware communities post which asked how to clear these credentials. I did some reverse thinking and found the options in the settings of VMware Workstation.

How to save login information

If you now would like to know how you can save your credentials, then just follow this quick steps:

  1. Click on “Edit” => “Preferences…”.

  2. On “Workspace” look for “Privacy” and click the checkbox “Offer to save login information for remote hosts”.

    VMware Workstation Preferences - Workspace

  3. Aaaand you’re done.

The next time you click on your lab environment (or any other remote host) then there is a pop up which asks you if you want to save the login or not.

2016-11-01_15h58_10

VMware vSphere – How to find floppy images (paravirtual SCSI)

Paravirtual

Today’s blog post is about some tricks and treat. It’s soon Halloween, folks… Today i’m working in my vSphere homelab. I tried to create a virtual machine. Well, that wasn’t that complicated. More complex was to find the floppy images for providing the PVSCSI driver. You’ll need this driver when you’re creating a paravirtual SCSI storage controller within your virtual machine. A quick search provided a good VMware knowledgebase article which helped me. Gathering the floppy images was then easy as pie.

You can’t access the “vmimages” folders through storage browser, it shows to be empty. This is an expected behaviour because the vmimages search through vCenter Server is turned off in ESXi 4.0/4.1. And i just assume that it’s also turned off in newer ESXi versions, like 6.0 which i’m using in my homelab. Because i actually can’t find the “vmimages” folder. For my case i installed all my nested ESXi hosts from scratch, manually, so there shouldn’t be any issue. This should also happen in production environments.

But now lets start to gather this folder. How do you get your hands on it? Let me show you.

Start putty and connect to one of your ESXi hosts (SSH service has to be enabled in the security profile / firewall on your ESXi host).

Run these two commands to create a folder on a datastore where you whish to store the images:

[sourcecode language=”plain” gutter=”true”]mkdir /vmfs/volumes/<datastore_name>/floppies
mkdir /vmfs/volumes/<datastore_name>/vmtools[/sourcecode]

Where <datastore_name> is the name of a shared datastore.

Run these commands to copy the contents of the original source folder to the newly created folder on the shared datastore:

[sourcecode language=”plain” gutter=”true”]cp /productLocker/floppies/*.flp /vmfs/volumes/<datastore_name>/floppies/
cp /productLocker/vmtools/*.iso /vmfs/volumes/<datastore_name>/vmtools/[/sourcecode]

Now you’re able to mount the floppy images in your VM to get access to the paravirtual SCSI driver.

Happy virtual machine creation, and Happy Halloween too 😉

Halloween

Active Directory – Change Notification (Inter-Site Replication)

IP

Since we know Active Directory, we know also that its replication works automatically between the domain controllers. The lowest value of this replication schedule is 15 minutes. You can’t get lower. If there aren’t that many frequent changes, or the active directory site is not large (probably with only one site) then this value should work for you.

But what if your active directory environment is larger? What if you have more than one site, on different locations, with different networks? Or what if you’ve got some remotedesktop services running in your main site and some users working with them in a branch office? What about the “i forgot my password” cases?

Well, there is a solution for you. We can tune-up the Active Directory Inter-Site Replication. The inter-site replication works also automatically, and you can also schedule the replication only for 15 minutes. But there are some settings we can tweak to get the domain controllers pulling the changes made recently. Let me show you how to do that.

First open “Active Directory Sites and Services” on your primary domain controller (that’s the icon with the blue “building”).

Management

Personally i think it’s a good approach to expand first all the items in the tree, so you can make sure you don’t miss any hidden item in this tree.

Let’s start now with the tuning operation. Expand “Sites” and “Inter-Site Transports” (if you haven’t already). Click on the IP folder.

Replication

Now right-click (or double-click) on your site link on the right hand side. If you did not rename it it’s just the DEFAULTIPSITELINK. Then click “Properties”. Then click on the “Attribute Editor” tab.

The attribute we should edit is called “options”. You can search for but you won’t find it. All attributes which haven’t actually a value set are hidden. To unhide it click on “Filter” and click “Show only attributes that have values”. The checkmark disappears and now you should find the “options” attribute in the list.

Filter

We now have to change this attribute to a specific value which allows us to tweak the inter-site replication.

Decimal Value Binary Value Explanation
1 1 USE_NOTIFY
2 10 TWOWAY_SYNC
4 100 DISABLE_COMPRESSION

You can use any combination of these. If your options attribute already has a value you need to perform a BITWISE OR operation on the existing value. If the value is 4, convert that to binary (100), perform an OR operation with binary 1, the result should be binary 101, which you convert to decimal (5) and enter as the value of the options attribute.

Now we have set this option (in my case i’ve set it to 1). That should look like that:

options set

But there’s more. At least in my production site there wasn’t an instant replication after changing the options attribute in the inter-site link, i had to dig a little deeper.

So i searched in every site, site link and server on this active directory infrastructure for this setting and changed it to 1 everywhere. It was some clicking, but it helped.

Sites

And don’t forget these naughty bits in the NTDS settings:

NTDS settings

Important tip:

Change notification will fail with manual connection objects. That is, if your connection objects are not created by the KCC (Knowledge Consistency Checker).

Conclusion for Inter-Site Replication

It was some clicking and also testing. But after changing the options attribute on every piece the result was a nearly instant replication. I created an active directory user object and it was replicated instantly to any other domain controller. Also with changes and deletion there weren’t any problems or issues. This tip with tweaking inter-site replication should help you if you don’t want to wait for 15 minutes. But think about the bandwith. Yes, bandwith. If you’ve got many changes and thus resulting some heavy active directory traffic you should keep an eye on the bandwith. This tweaking works fine for site links with 20MBit/s and more. If your branch office is connected with less bandwith (like widely used 2 or 5Mbit connections), you should probably let this setting unchanged and work with these 15 minutes instead.