Working with templates in vSphere 7

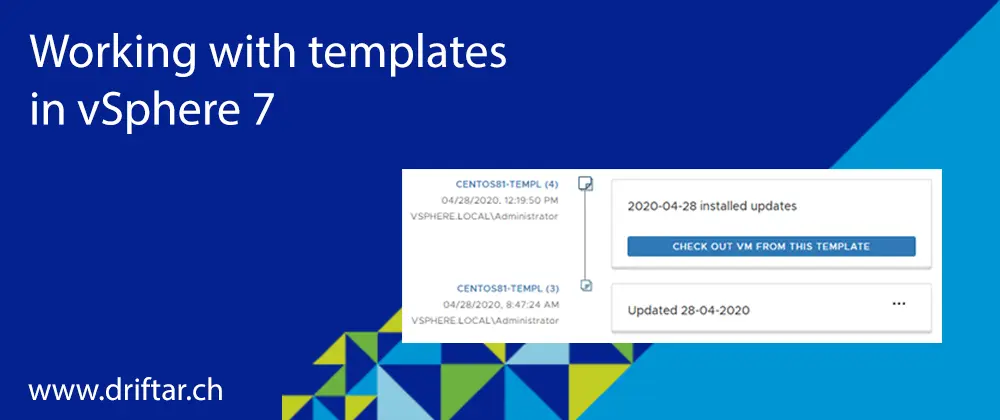
One new great feature in vSphere 7 is template versioning. You heard that maybe already somewhere, or read it on various blog posts shortly after the announcement of vSphere 7.

I recently had to restore some of my Windows templates because something went wrong. Then I said, why not try out the new template versioning? Well, it’s easier said than done. I’ve found out that working with templates in vSphere 7 isn’t much of a difference than it is in vSphere 6.x. It’s also not a big difference when working with content libraries. But there are still some differences and maybe even limitations. I’ll update this post when I find out more about this. Maybe I’m just doing it wrong, or it is a bug like the one where VMs and Templates view doesn’t show folders after two levels in vSphere client (KB 78693).

What is vSphere template versioning?

First, it’s a great feature! With vSphere 7, you can now have multiple versions of a template. For example, you create your base template, then there’s the next version when you install patches and updates, and so on. If there’s something wrong, you can revert to the previous version of your template. Also, if you’ve got a huge template chain already, you can delete the oldest versions of your template. In my humble opinion, there is some space for improvement when working with templates and versioning. But I’ll show you later what that means.

How to work with the new versioning?

As far as I have tested it, you can’t convert existing templates to a template with versioning enabled. I mean there is no button like “convert that template”. It’s a manual task. That counts for templates that are stored somewhere on a datastore connected to your ESXi host as well as for templates that are stored in the content library. But as I already mentioned, maybe I’m just doing it wrong (hopefully not). And in case this should work, I’ll find it out and update this post.

How to work with template versioning then? It’s pretty easy. You set up your virtual machine and do everything you need to prepare it as your VM template. Michael White has some great posts about creating VM templates. Let’s assume that you’ve got your VM ready for the next steps.

Read more

Bulletproof tip on how to find the right Windows VMDK

I did this so many times already, and I never thought that I could document it, or put it somehow into a blog post. And maybe you already know how that works, how you can find the right Windows VMDK to resize it.

It’s not that complicated if you know what to search or look for. And it’s easy as pie when the VM has only one disk, or maybe two. But imagine a SQL server, which has like eight disks or more, depending on its setup or software recommendation? Then it might get tricky to catch the right VMDK at the first shot.

But this bulletproof guide should help you out! Maybe that gets a new category, bulletproof. We’ll see. But let’s get back to the main topic here.

How do I find the right Windows VMDK?

I deliberately write Windows because I only work on Windows machines for that blog post here and not Linux VMs. It might get another blog post for that sometime in the future. But that depends on the Linux distribution or flavor because Linux is not Linux (don’t hate me please). But there are Debians, RPMs, Unixes, and so many other derivates. Not always the same tools available, not the same commands or syntax. You’ll get the point. Let’s focus on Windows VMs for now.

So, you’ve got that huge VM with several disks, and you have to resize one of them. Lucky you if it’s the C: drive because usually, that’s the first VMDK. Usually. But this guide shows you how to find the right VMDK. And always, making the disk bigger is easier than shrinking it. So it’s better to find the right candidate in the first shot, isn’t it?

Read more

Backup and Restore vCenter Server Appliance

Just a few weeks ago, vSphere 7 saw the light of day. And people went crazy! New ESXi servers with vSphere 7 have sprung up like mushrooms. So many people directly upgraded their homelabs, or maybe even their production systems.

This blog post, I know the last post is some time ago, will show you how you can backup your vCenter Server Appliance with their integrated backup functionality, and also how you can restore it, in case something went wrong. Except for two ways, I went through all options for backup targets and tried to find out how to configure it. So there should be at least one way how you can back up your vCenter data to a proper location in your data center.

Why is it a good idea to back up your vCenter

vCenter is your management central in terms of virtualization. You manage all your ESXi server with it, your clusters, your data center networking maybe (with NSX), you’ve got some automation running, got your host profiles, storage policies, etc. in place there. Why lose all the stuff you’ve configured over a longer period, with maybe much tinkering, try and error? Backing up vCenter is not so hard. You need a backup target, a user and a password. In vCenter 6.7 you can even schedule the backup, which makes things even easier than before, where it wasn’t possible to configure a schedule.

Supported protocols for backup

vCenter supports the following protocols for backup:

  • FTP
  • NFS
  • SMB
  • FTPS
  • SCP
  • HTTP
  • HTTPS

This guide will show you how to configure all of the above protocols, except HTTP and HTTPS. I didn’t see a sense in setting up such a configuration in my lab, because it doesn’t seem to me as such backup targets would exist in a company either. I also think that these two protocols might be the slowest, compared to all the other protocols available. In data centers, no matter if on-premises or cloud, the often-used protocols are NFS and SMB. So chances are high that there might be already a suitable backup target for vCenter. Or it can be easily created. Also, FTP is still commonly used, and we’ve got also secure options with FTPS and SCP.

Backup performance

To be honest, the backup performance was not my top priority. I wanted to configure and test all supported protocols except HTTP and HTTPS. It’s clear that performance matters, at least to a certain degree. Backup windows might be small, or systems should not be impacted with a heavy load. Before we move on, I’d like to show you how the performance was during my tests.

I’ve set up a new vCenter server appliance for this backup and restore test. It is a tiny deployment with 2 CPU, 10GB memory and default disk size (thin). There is nothing configured within vCenter, no hosts, no clusters, nothing except backup. You can see that the amount of data transferred is the same in all tests. In regards to the duration, we’ve got the SMB protocol on the first place, followed by FTPS on the second, and NFS on the third place. Yes, I’m aware of “but there’s ftp:// and not ftps://”. I’ve configured FTPS as you can see later on the screenshots, but when I executed the backup job, it was logged as “ftp”. You can spot the difference at the port used for FTPS.

Read more

Upgrade VCSA through CLI Installer

My team and I were tasked with a global vSphere upgrade on all of our ESXi hosts, hyper-converged systems and our vCenter. We took enough time to get the inventory, check all the hosts for compatibility and test the various upgrade paths. The upgrade will be rolled out in multiple steps due to personal resources (we’re a small team and currently, it’s summer holiday season) and also to avoid too much downtime. In this blog post, I’d like to share some personal experiences regarding the upgrade of our vCenter. It didn’t work as we’ve planned. But in the end, all worked fine. I’d like also to shoutout a big thank you to my team. You guys rock!

Foreword

Before we dive deeply into the vCenter upgrade process, and what happened, I’d like to explain some steps first to better understand our approach and the upgrade process in general.

One of the milestones is (at the writing of this blog post already “was”) the upgrade of our vCenter. We’re using vCenter for our daily tasks like managing virtual workloads, deployment of new ESXi hosts, etc. But before we could upgrade our vCenter from 6.5 to 6.7, we had to do some host upgrades first. Our hyper-converged infrastructure was running 24/7 without getting much care, like care in the form of firmware upgrades. There was just not enough time to do maintenance tasks like this throughout the last few months or maybe years. Maybe some people also were just afraid of touching these systems, I don’t know for sure. The firmware was old but at least the hypervisor was on a 6.0 version and also in pretty good shape as well.

So we’ve scheduled various maintenance windows, planned the hyper-converged upgrades and made sure that we’ve downloaded everything from the manufacturer we need to succeed. The firmware upgrade went well on all hosts. One host had a full SEL log and that caused some error messages. No real issue at all, but some alerts in vCenter on that cluster we had to get rid of.

The firmware upgrade on one of the hyper-converged cluster took about 18 hours. That was expected, somehow, because the firmware was really old, and did not support higher ESXi versions that 6.0. But everything went well and we had no issues at all, expect the full SEL log which then has been cleared.

After that firmware upgrade, we were able to upgrade the ESXi version on all of the hyper-converged clusters to a 6.5 level. This was needed because of some plugins used to manage these hyper-converged systems. Ok, to let the cat out of the bag, we’re using Cisco HyperFlex and the plugin I’m talking about is that HX plugin. The version for ESXi 6.0 wasn’t supported in vCenter 6.7. That’s the reason we had to upgrade the HyperFlex systems first to ESXi 6.5.

As you know for sure, you can’t manage ESXi hosts later than 6.5 in vCenter 6.5. So we had to do a stop here for the moment, but we were now at least able to upgrade our vCenter. All other hosts were already on 6.0 since they were installed, so no issues upgrading to vCenter 6.7.

Oh, did I already mention that our vCenter doesn’t run on-premises but on a cloud provider? No, it’s not VMC on AWS, but some other IaaS provider. That didn’t make it easier.

But let’s dive into the main topic now, enough of explanation, let’s do the hard work now.

Read more

Enable Flash Player in Google Chrome 69

Some weeks ago Google released the newest version of their Chrome browser, version 69. I thought yeah, get it and update it. I really like Google Chrome because it supports all the websites I’m visiting often (or at least did, but more on that later) and it’s fast. You can also customize it with plugins like mouse gestures or so to customize it for your needs. What I didn’t know is that Google switched off the support for Flash Player as far as I knew it from the older versions. You aren’t able anymore to add websites to the allow or deny list in the Flash settings within the browser. Or at least you can’t add the websites directly on that list in the settings. There are some more clicks to do. Officially announced was the end of Flash Player by Adobe. By the year 2020, Flash Player won’t exist anymore, won’t be supported by Adobe nor by the most used browser software. But there’s a “but”. You can manually add specific websites to the allow or block list of Google Chrome, but not in the way you might know. But why the heck should I use Flash anyway? All my favorite websites are already HTML5 compatible and all stuff works without that crappy Flash plugin! But wait! Do you use the VMware vCenter browser client? Probably the Flex Client because you still have the need for it, like vSAN, Update Manager, or 3rd party plugins of different software and hardware vendors within vCenter? Then you’ll have the same issues as I had. The vCenter Flex Client (aka Flash client) obviously won’t work anymore without Flash. Yes, I know, you don’t need to use the Flex Client for vSAN or the Update Manager because in vCenter 6.7 it is finally available. But what about the 3rd party plugins? There is a lot of stuff out there you probably need, I don’t know your infrastructure. I can only compare with mine. But I can tell you, enabling Flash Player in Google Chrome, even in the most recenter version 69 is easier than you think. It’s just some steps and clicks, no rocket science!

Read more