VMware – vSAN Deploy and Manage course – Day 1

vSAN

It is some time ago when i published my last blog article. I wasn’t really in the mood for because i am learning and preparing for my VCP6-DCV. And there is a helluva stuff to stuff in my brain. This week i’m publishing some articles, beginning with this one. Not because i don’t learn for VCP, but because i’m learning right now and because i’m attending the VMware Virtual SAN Deploy and Manage course. Lets call this a recap. My brain is still collecting data and sorting it in the right shelf. This recap helps me with that. But lets start now. You probably don’t wan’t to know whats going on in my brain…

Day 1

Module 1 – Introduction to the course

To break the ice our instructor Paul McSharry started with a short introduction round for all attendees. Paul introduced himself (and his cat too…). I didn’t know him personally. I just knew that he is an expert in his area and a instructor. I heard from other people i know that Paul does his stuff very well. So i expected a good start, and finally the whole day was great.

First of all it’s now official that it’s called vSAN (with a small v in front) and not VSAN. VMware recently did a name change on this particular product. It should show that this product (vSAN) is integrated directly into the ESXi hypervisor. vSAN is a policy-driven software-defined storage tier. There are no dependencies on a VM, it runs directly in the hypervisor. We all knew that. You don’t need a special software or plugin to use vSAN, it’s just a matter of licensing. But now the name of the product makes that clear too.

When a customer wants that software defined storage is flexible, easy to use and install, quick and scalable. He doesn’t want to make compromises in performance. And it should also run in my private cloud and in my public cloud too.

Because of my customer size i don’t work often with scalability. I am somehow feeling ashamed for that. We always calculate some reserves into the systems, because we know our customer and always clarify the needs of the customer. Now i’m 100% sure what’s this with scale-out and scale-up. You scale-up when you add some disks to your hosts to increase capacity (or caching) tier in virtual SAN. You scale-out when you add one or more hosts to your (vSAN)-Cluster to increase overall performance and capacity.

Module 2 – Storage fundamentals

In the second module we talked about some basic storage stuff like spinning disks (rotating rust) and SSD’s, about IOPS and so on. We discovered some good points about latency, and why it’s good to have at least flash cache in a hybrid vSAN, or better go all-flash. It doesn’t mean that spinning disks are old school and that you shouldn’t use them. They are great in prize and capacity comparison. Think about an archive system, or a huge backup storage. For this use cases the spinning disks still deliver a fair amount of IOPS.

We took also a short review on RAID levels. It’s always good to know that, and hear it from time to time. When you’re using vSAN you don’t have to create a RAID array on your built-in storage controller. Just make the controller passing-through the disks to ESXi / vSAN and it’s all good. A discussion worth were also some storage protocols like Fiber Channel (FC), iSCSI and NFS. And last but not least the VMware HCL, the hardware compatibility list. Always check this if you build your own vSAN ready nodes, or even if you upgrade firmware (especially disk / controller firmware) on a certified vSAN ready node.

Module 3 – What is vSAN and use cases

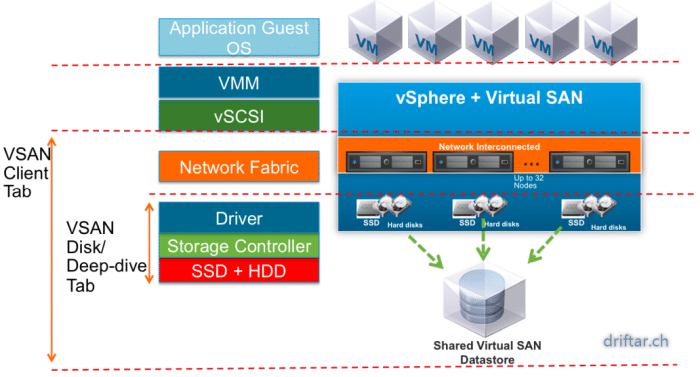
Creating vSAN is easy. You can tune, set limits etc. very similar to VMs. Every single I/O gos through the hypervisor. There is no HBA and no fabric in between host and storage. Thats a big plus regarding the storage latency, which means the latency will be decreased massively. With vSAN you use local ressources (CPU, memory and storage). If you have to expand capacity you can easily add more disks (scale-up) or add a host (scale-out). Lets take a look at the ESXi hypervisor. It already comes with HA, DRS, VDP, vSphere Replication. VMware Virtual SAN is compatible with these common features. It’s just a matter of licensing. You are using different storage tiers? You don’t have to with vSAN. It’s policy based. Limit IOPS for noisy neighbors or to guarantee an SLA.

You can build your own vSAN ready nodes (brownfield / specific pods). And you have always to check the HCL. Or you choose from preconfigured vSAN ready nodes from your favorite hardware vendor. HPE, DELL etc. will provide approved solutions. And last but not least there are the DELL EMC VxRail or even VxRack systems, preinstalled and preconfigured.

Use cases

VMware Virtual SAN is since version 6.0 now in production. One of the most uses is for virtual desktop infrastructure (VDI). Customers run also their Exchange servers, transactional data bases and so on with vSAN. There is no right or wrong. If you just wan’t to free up space in your racks and replace old hardware, then you’re good to go. With two height units you can replace four servers and a shared storage system which demand all together at least 10 units. Converged systems are a space saver. And don’t forget about energy savings.

Module 4 – Virtual SAN concepts, requirements, install ckecklist

A vSAN datastore is accessible to all hosts in the vSAN cluster, wether or not they have own local storage. You can have capacity hosts and compute hosts if you want. Other storage topoligies can easily coexist with vSAN, there is no limitation. A vSAN datastore is built from disk groups. Every disk group is a single capacity unit from a host and provides cache and data. You must have one flash disk per disk group and one or more capacity disks. There is a limit of five disk groups per host / node.

You need at least three vSAN hosts / nodes for production environments. Your data (for example a VM) is stored all across the hosts in the cluster. Three components are stored in total; two replicas and a whitness. If a host failure occurs the cluster needs the quorum to decide what to do with your data. Thats the reason why there are three components.

Install checklist

  • HCL checked?
  • disk controller in pass through?
  • host cache and capacity disks?
  • VMkernel marked as vSAN?
  • Multicast on network level?
  • Uplink or VLAN considerations?
  • 1GB or 10GB network connection?
  • Cluster of three nodes?
  • Standard switches or distributed virtual switches?

Conclusion

Setting up vSAN is easy as pie. Meet the requirements and turn it on:

  • setup vSAN networking
  • enable vSAN on the cluster
  • select automatic or manual disk claiming
  • create disk groups if you set automatic disk claiming

And because it’s that easy, the official movie about setting up VMware Virtual SAN is only about three minutes long. There you go.

https://www.driftar.chyoutube.com/watch?v=1EDWKE93ivw

Please read the other blog post about the vSAN deploy and manage course too:

VMware – Configure vSphere Auto Deploy

Auto Deploy

The last few days and weeks i was preparing for my VCP6-DCV exam. Well, i’m still preparing for it, there is ahelluva stuff to learn and understand. One thing is vSphere Auto Deploy.

vSphere Auto Deploy is a cool feature for large infrastructures. Imagine, you just have to mount your ESXi hardware hosts in the racks, start them, and they are getting their software, setup and configuration via network. Without the need of any USB, CD or remote mounting of ISO files (like with HPE iLO or DELL iDRAC), and without any local storage if you boot your ESXi hosts from a shared datastore. Your host is online in just a few minutes and ready for use in your cluster, or whatever scenario you need it for.

Today i did some Auto Deploy stuff. And it is not that easy as i thought. You can’t do much via the vSphere Web Client (i’m absolutely the GUI type of sysadmin). You have to do some PowerCLI stuff, but not that much as i was afraid of. Let me show you how i did it. And please drop a comment if there is anything wrong, or if there is anything to make better. I’m pleased to update this post if necessary.

Stage 1 – Preparation for Auto Deploy

What do you need for using Auto Deploy? There is not much:

  • vCenter (on Windows Server or the Appliance)
  • PowerCLI
  • a TFTP server (i used Open TFTP Server which worked very fine)
  • ESXi Offline Bundle
  • Probalby some hosts you want to setup with Auto Deploy

Let me give you some tips about the configuration for vCenter and the Open TFTP Server. With this piece of software i had to try and fail a few times until i’ve got it up and running.

vCenter configuration – Enable Auto Deploy

  1. Login to your vCenter with the Web Client.
  2. Click on “Administration“.
  3. Click on “System Configuration” and then “Services” on the next page.
  4. Click on “Auto Deploy“.
  5. In the toolbar on top, click “Actions” and then “Start“.
  6. Under “Actions” and “Edit Startup Type” you can configure Auto Deploy for a automatic or manual start.

vCenter configuration – download TFTP boot zip file

  1. Login to your vCenter with the Web Client.
  2. Click “vCenter Inventory Lists” and then click “vCenter Servers“.
  3. In this overview click your vCenter Server.
  4. Click on “Manage” then “Settings” and then “Auto Deploy“.
  5. Click on the link “Download TFTP Boot Zip” to download the file. You’ll need it later for the TFTP server.

Open TFPT Server – setup and configuration

  1. Download and install the Open TFTP Server (i’ll us this software in my configuration).
  2. Use the standard settings for installation.
  3. Navigate to the setup folder (e.g. C:\OpenTFTPServer) and open the “OpenTFTPServerMT.ini” with a text editor.
  4. You’ll need to configure the [HOME] parameters. This is the folder where you have to save the TFTP Boot Zip from above.
  5. Locate the [HOME] parameter, ignore all the text there and add just “C:\TFTP-Root” (or any other folder you’d like) after the last line of text in this part of the INI file. Add the path to the folder without quotation marks.
  6. Restart the Open TFTP Server service.
  7. Copy your “TFTP Boot Zip” file from above to the folder you added in the INI file and unpack it directly there. You should have now about 11 files, including the zip file.
  8. Restart the Open TFTP Server service again.

Configure DHCP server with options

You need to configure your DHCP server with two options so that your ESXi hosts can boot via network / PXE, get an IP address and configuration file.

  • Add option 66, which is frequently called next-server. Add the IP address of your TFTP server as value.
  • Add option 67, which is frequently called boot-file. Add undionly.kpxe.vmw-hardwired as value.

Stage 2 – Create depot, profiles and rules, and deployment

  1. Download the ESXi Offline Bundle from VMware and save it in a folder on the machine where you’re doing this stuff.
  2. Open PowerCLI and connect to your vCenter (Connect-VIServer).
  3. Add-EsxSoftwareDepot c:\tmp\update-from-esxi6.0-6.0_update02.zip.zip
  4. Add-EsxSoftwareDepot http://<vcenter server>/vSphere-HA-depot
  5. Find out which profiles are in this offline bundle with “Get-ESXImageProfile | fl * | out-file C:\tmp\profiles.txt
  6. New-EsxImageProfile -CloneProfile “ESXi-6.0.0-20160302001-standard” -name “ESXiStatelessImage”
  7. Add-EsxSoftwarePackage -ImageProfile “ESXiStatelessImage” -SoftwarePackage vmware-fdm
  8. New-DeployRule -Name “FirstBoot” -Item “ESXiStatelessImage” -AllHosts
  9. Add-DeployRule -DeployRule “FirstBoot”
  10. Now boot one of your hosts. If everything is configured until this point you should see the ESXi image booting.
  11. Login to your vCenter with Web Client. You should probably see the new auto-deployed host in your inventory. In my lab this was the case.
  12. Configure this host (like networking, storage etc.) through web client.
  13. In the web client, create a new host profile based on this newly booted host named “ESXiAutoDeploy”.
  14. New-DeployRule -name “ProductionBoot” -item “ESXiStatelessImage”, ESXiAutoDeploy, <target_cluster> -Pattern “vendor=<unique hw identifier>”
  15. Add-DeployRule -DeployRule “ProductionBoot”
  16. Remove-DeployRule -DeployRule FirstBoot -delete
  17. Boot all of your auto deploy hosts.
  18. Assign the created host profile to these hosts.
  19. Reboot these hosts => aaaand you’re done.
  20. If you want to save the newly created image profile as a software depot, to make changes to a later time if needed, just do this:
    1. Export-EsxImageProfile -ImageProfile “ESXiStatelessImage” -ExportToBundle -FilePath c:\tmp\ESXiStatelessImage.zip

Conclusion

As i wrote above it is not that easy, but it was not so hard as i was afraid of. There are some things to consider, like ESXi configuration with correct networking, storage etc. to make later the suitable host profile which should fit all of your hosts. In this first try i didn’t create a big configuration, just some basic stuff to understand Auto Deploy and for the writing of this blog post.

I have to investigate the password policy, or better, how i can set a password policy. Because my test ESXi host did not have a root password after assigning the host profile. I know i configured the password in step 12 above beside the rest of the configuration. But the password didn’t come with the host profile. But anyway, the configuration of Auto Deploy worked. Now i’ve got some more tasks, for example to find out about this password issue.

Special thanks to Duncan Epping for his cheat sheet (no, i did not read his article, just his cheat sheet, but yes, i saw the link to his article). So i had the commands needed and a thin red line for orientation.

Also thanks to Vladan Seget for his article about some new features in vSphere 6.5 including Auto Deploy (which has now a GUI! How cool is that?)

VMware – Read before upgrade to vSphere 6.5

VMware

Yesterday VMware announced the general availability of the brand new vSphere 6.5. They announced the new version at this years VMworld in Barcelona. But now you can download and install the bits. But there is a catch. Please make sure you read and understand all the important information before upgrading to vSphere 6.5 because there might be some limitation at the moment. Let me bring some light into the darkness.

Compatibility considerations

You should not upgrade to vSphere 6.5 if you are running one (or some / all) of these software components in your environment:

  • VMware NSX
  • VMware Integrated OpenStack
  • vCloud Director for Service Providers
  • vRealize Infrastructure Navigator
  • App Volumes
  • Horizon Air Hybrid-Mode
  • Integrated OpenStack
  • vCloud Networking and Security
  • vRealize Business for Cloud
  • vRealize Configuration Manager
  • vRealize Hyperic
  • vRealize Networking Insight

These components are not yet compatible with vSphere 6.5. But as we know VMware, they are already working for updates. Please check the VMware Product Interoperability Matrix for further information about updates to the products above.

  • If you have to revert a migration, please check VMware KB2146453 for reverting a vCenter Server to Appliance migration.
  • To roll back a vCenter Server Instance on Windows, please check the vSphere Upgrade Guide.

Upgrade Considerations

Before upgrading your environment, review these critical KB articles to make sure the upgrade will be successful.

vCenter Server

vCenter Server to vCenter Server Appliance

PSC High Availability

ESXi

NSX

vRealize Operations

vSphere Web Client

Known Issues

vCenter Server

vRealize Operations Manager

Security Considerations

TLS protocols

Encryption considerations

  • Running a encrypted KMS virtual machine can cause a loss of data in the event of a host failure.

More details in the VMware Knowledgebase (KB2147548):

https://kb.vmware.com/kb/2147548

*** Update ***

Backup Considerations

There is one thing i missed to mention. If you are using Veeam Availability Suite v9.5 then you can’t do backups with vSphere 6.5 at the moment, because Veeam does not support this vSphere version yet. But also the guys at Veeam are working on an update, which will be (historically) release about two months after general availability of the new vSphere version.

So stay tuned!

VMware vSphere – How to script vMotion for your VMs

vMotion Script

VMware vMotion is a pretty good feature regarding the availability and load balancing in your vSphere environment. Today i created a vMotion script to help me create a backup with a backup software.

As so many times my blog posts are the result of a problem i had and for which i needed a solution. It shouldn’t be different today. I worked in my vSphere homelab. I created some virtual machines and installed my backup software of choice. My idea was to have a backup before doing any work with the VMs, just in case i screw it up. So i can easily go back to a known good state of the VM and try again. But this task wasn’t so easy.

As a vExpert, VMCE, MVP, Trainer or many other different tech people you can request a NFR license key for Veeam Availability Suite. So did i. The NFR key was delivered quickly to my mailbox, and was even faster installed in Veeam. But there was a catch. At least my NFR license is limited to two sockets, but with no limits for protected VMs, and it comes with a full 1-year retention period, instead of just 30 days as the regular trial.

So i had to deal with the fact that only one host (i’ve got three hosts in my lab with two sockets each) is protected by Veeam. This limitation woke the hunter in me because i had to find a solution. My goal was to backup all my VMs but with only two licensed sockets. The approach I chose was to set vSphere DRS to manual, then do a vMotion of all VMs to the host which helds the Veeam license, doing a backup and set DRS back to fully automated after backup. If you are working with ressource pools you shouldn’t disable DRS, because that results in removing the ressource pools. But there is a workaround for that too. Instead of creating a new problem i did the easy way and just set DRS to manual.

How to get the vMotion script

If you’re familiar with GitHub you can download my script from there:

https://github.com/driftar/vSphere

For any other user i’ll provide the script directly here:

[code lang=”powershell” gutter=”true”]
# .SYNOPSIS
# This script will start a vMotion of all virtual machines on a specified datastore to a specified ESXi host.
# If you are working with a backup software which is licensed to a specific host, # this will probably help you.
# Only recommended in smaller environments or if you have enough ressources on this host.

# .DESCRIPTION
# The script loads a PSSnapin; it sets some PowerCLI options; it connects to your vCenter Server with the given credentials;
# it gets all your VMs in an array; it starts then a Host vMotion of all the VMs in the array to a specified ESXi host.

# .NOTES
# File Name : pre-backup.ps1
# Version: : 1.0
# Author : Karl Widmer (info@)
# Prerequisite : PowerShell V2 over Vista and upper / VMware PowerCLI 6
# Tested on: : Windows Server 2012 R2
# with PowerCLI : PowerCLI 6.3 Release 1 build 3737840
# with PowerShell: 4.0
# Copyright 2016 – Karl Widmer / driftar’s Blog (www.)

# .LINK
# Script posted over: https://www.driftar.ch

# Load PowerCLI cmdlets
Add-PSSnapin VMware.VimAutomation.Core -ErrorAction "SilentlyContinue"

# Set PowerCLI behaviour regarding invalid certificates and deprecation warnings
Set-PowerCLIConfiguration -InvalidCertificateAction ignore -DisplayDeprecationWarnings:$false -confirm:$false

# Define vCenter User and target Datastore
$vcHost = ‘vcenter.domain.com’
$vcUser = ‘administrator@domain.com’
$vcPass = ‘password’
$datastore = ‘your_datastore’
$cluster = ‘your_cluster’
$targetHost = Get-VMHost -Name yourhost.domain.com

# Connect to vCenter
Connect-VIServer $vcHost -User $vcUser -Password $vcPass

# Get VMs (pass array of VMs to $VMs, for example ‘get-datastore test | get-vm’)
$VMs = Get-Datastore $datastore | get-vm

# Get Cluster information to set DRS to Manual for backup window
Set-Cluster $cluster -DrsAutomationLevel Manual -Confirm:$false

Foreach($vm in $vms) {
Write-Host ("Start Host vMotion for VM ‘" + $VM.Name + "’")

Move-VM -VM (Get-VM -Name $vm) -Destination (Get-Vmhost $targethost) -RunAsync

Write-Host ("Waiting…")

Write-Host ("Host vMotion for VM ‘" + $VM.Name + "’ finished")
}

# This last script step should probably be executed in a post-backup script step.
# It sets the DRS automation level back to fully automated. Your VMs will then probably load-balance on your hosts.

# Set DRS on cluster back to FullyAutomated after backup window
Set-Cluster $cluster -DrsAutomationLevel FullyAutomated -Confirm:$false
[/code]

Update 07.11.2016

After updating my ESXi hosts to 6.0.0 Build 4510822 my script stopped working. So i simplified the script and released version 2.0.

VMware Workstation – Save login information for remote host

This post is gona be a short one. It was once again a problem for which I needed a solution. Today i was working in my vSphere homelab. I’ve set up some more virtual machines, installed my availability software of choice and did some reading. If you are a VMware Workstation user, then you probably know the feature to connect to a remote server, like, for example a vCenter Server. That’s a pretty handy feature which i really like. You can connect to your lab environment and you can access all your VMs directly and easy, without any remote desktop and stuff.

One thing about this feature was quite annoying for me. Everytime when i connected to my lab environment i had to enter my credentials. It didn’t bother me very much, it was just annoying. So i searched for more information but there wasn’t much. Then I found a VMware communities post which asked how to clear these credentials. I did some reverse thinking and found the options in the settings of VMware Workstation.

How to save login information

If you now would like to know how you can save your credentials, then just follow this quick steps:

  1. Click on “Edit” => “Preferences…”.

  2. On “Workspace” look for “Privacy” and click the checkbox “Offer to save login information for remote hosts”.

    VMware Workstation Preferences - Workspace

  3. Aaaand you’re done.

The next time you click on your lab environment (or any other remote host) then there is a pop up which asks you if you want to save the login or not.

2016-11-01_15h58_10