Today I was working in my homelab. A few days ago I started to rebuild it. Initially, I started with three DELL PowerEdge servers for some time, but the consumed to much power and produced to much heat. My approach was to have as many physical components as possible. Well, it didn’t work so well as planned (more here, but that wasn’t all…).
I’m running now only one PowerEdge server, installed 144GB of memory (did some frankensteining with one other PowerEdge server) and installed some SSD drives. I also installed a PERC H700 RAID controller because my white box HPE H240 HBA doesn’t like RAID much, and my HPE P822 RAID Controller stops the server from booting. But let’s go into the topic, VAAI supported iSCSI LUNs on a Synology NAS. Yes, I already wrote about that topic here. But with the current version of DSM (Disk Station Manager), the feature set changed a little. And you don’t need the VAAI plugin (because it’s only for NFS datastores and currently not supported on vSphere 6.7, ohhh myyy…).
This quick guide should help you to create a VAAI enabled iSCSI datastore on your Synology NAS. It’s a straight-forward guide, and I’m assuming that your Synology BOX is empty. As my NAS came back from repair today, I didn’t care and wiped all disks. So mine is empty now.
But what is VAAI?
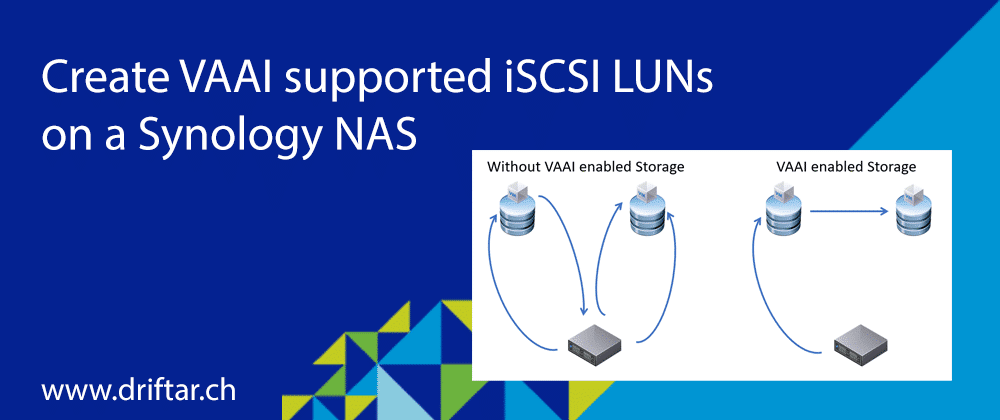
Long story short, VAAI stands for “VMware vSphere Storage APIs Array Integration (VAAI)”. Through this API, storage operations, like cloning of a VM, will be offloaded to the storage itself. Not because it’s just possible, but because it’s faster and with less unnecessary data traffic between the ESXi host and the data store.
On a datastore without VAAI / hardware acceleration, the ESXi initiates the process to clone a VM. But instead of the storage, cloning the data blocks itself (for example to another LUN), it’s the ESXi host receiving all the data blocks and sending/writing them to another LUN. On a data store with VAAI / hardware acceleration enabled, the ESXi hosts only initiates the process. All data blocks will be then cloned by the storage itself. To get all the benefits from that, your storage has to support these features. Check with the hardware vendor if your storage is VAAI ready or not.

Note: I’m not good at drawing…
Let’s dive into that topic now.
The basics…
First, we need a storage pool. That’s basically the physical disk space which we then will consume with volumes. To get all the advanced features, you have to create a pool with “Higher flexibility”. This type of storage pool also supports multiple volumes, but more on that later.
- Log in to your Synology NAS
- Open the “Storage Manager” (located in the top left menu)
- Click on “Storage Pool”
- Click “Create” and choose the correct type of storage pool

The more physical disks you have in your Synology, the more storage pools you can create. One disk can only be in one storage pool. So in my case, I’ve got 3x 4TB SATA disks with SHR (Synology Hybrid Raid) in one pool. But I’ve got only a DS1515+ with five disk slots (where two of them are equipped with SSD disks). If you’ve got a bigger Synology with more disks, then you can create also more disk pools if needed.
After creating a storage pool with higher flexibility we can move on to the next steps.
The slightly advanced…
As we’ve got now a storage pool, we can play around with volumes if we fancy. I did so because I wanted a dedicated volume for iSCSI LUNs and other volumes for other stuff like NFS or regular SMB file shares. In case I screw up something, I just wipe the volume and start from scratch. It’s still a homelab, isn’t it?
- Still in the storage manager, click “Volume” and then “Create” to create a new volume

- Follow the assistant to create a new volume


Let’s now dive into the iSCSI LUNs in the next steps.
Little more advanced…
We’ve got now everything ready what we need for the next step. We’ve created a storage pool with higher flexibility and also a new volume on that storage pool, where we will place our iSCSI LUNs on.
- Still on your Synology dashboard, click the top left menu and click on “iSCSI Manager”
- Click on “LUN” to create a new LUN

- Now follow the assistant to create a new iSCSI LUN

Note: to benefit from the advanced LUN features, you have to set thin provisioning either with or without space reclamation. Otherwise, you don’t get the advanced features, like LUN snapshot and replication, VMware VAAI or Windows ODX.


Note: you can directly create an iSCSI Target as well when creating a LUN first. Or you can map the LUN to an already existing Target.


That’s it, your iSCSI LUN has been created. And don’t we all like advanced features? 😉
Conclusion
This step by step guide should help you to create a VAAI enabled iSCSI LUN on your Synology NAS. If so, I’m happy to read your feedback in the comments or via social media.
If we’re now going to compare two iSCSI LUNs, one with advanced features and one without, we can see the differences in the iSCSI Manager. The advanced LUN has a greenish color and shows no used byte, where the regular LUN shows up in blue with the 10GB used because it’s not thin provisioned.

If we go into vCenter and scan the iSCSI adapter for new storage devices and VMFS volumes, we can also see the difference. The advanced LUN has hardware acceleration enabled, the regular LUN is unknown what means no hardware acceleration.

Now we’ve got VAAI enabled / hardware accelerated data stores and all cloning operations can now be offloaded to the storage, instead of ESXi handling that.