Just a few weeks ago, vSphere 7 saw the light of day. And people went crazy! New ESXi servers with vSphere 7 have sprung up like mushrooms. So many people directly upgraded their homelabs, or maybe even their production systems.
This blog post, I know the last post is some time ago, will show you how you can backup your vCenter Server Appliance with their integrated backup functionality, and also how you can restore it, in case something went wrong. Except for two ways, I went through all options for backup targets and tried to find out how to configure it. So there should be at least one way how you can back up your vCenter data to a proper location in your data center.
Why is it a good idea to back up your vCenter
vCenter is your management central in terms of virtualization. You manage all your ESXi server with it, your clusters, your data center networking maybe (with NSX), you’ve got some automation running, got your host profiles, storage policies, etc. in place there. Why lose all the stuff you’ve configured over a longer period, with maybe much tinkering, try and error? Backing up vCenter is not so hard. You need a backup target, a user and a password. In vCenter 6.7 you can even schedule the backup, which makes things even easier than before, where it wasn’t possible to configure a schedule.
Supported protocols for backup
vCenter supports the following protocols for backup:
- FTP
- NFS
- SMB
- FTPS
- SCP
- HTTP
- HTTPS
This guide will show you how to configure all of the above protocols, except HTTP and HTTPS. I didn’t see a sense in setting up such a configuration in my lab, because it doesn’t seem to me as such backup targets would exist in a company either. I also think that these two protocols might be the slowest, compared to all the other protocols available. In data centers, no matter if on-premises or cloud, the often-used protocols are NFS and SMB. So chances are high that there might be already a suitable backup target for vCenter. Or it can be easily created. Also, FTP is still commonly used, and we’ve got also secure options with FTPS and SCP.
Backup performance
To be honest, the backup performance was not my top priority. I wanted to configure and test all supported protocols except HTTP and HTTPS. It’s clear that performance matters, at least to a certain degree. Backup windows might be small, or systems should not be impacted with a heavy load. Before we move on, I’d like to show you how the performance was during my tests.

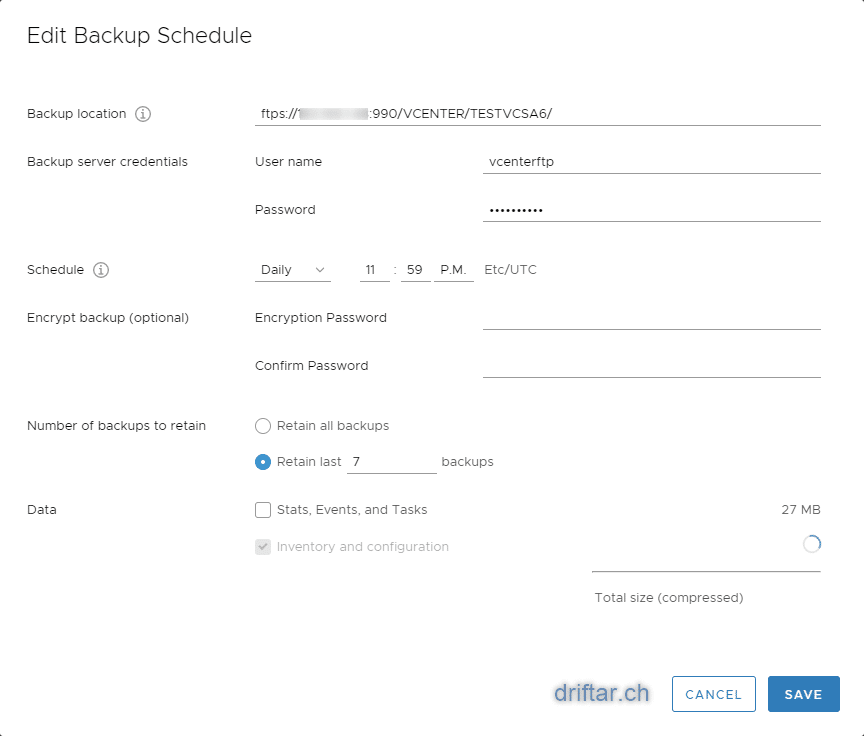
I’ve set up a new vCenter server appliance for this backup and restore test. It is a tiny deployment with 2 CPU, 10GB memory and default disk size (thin). There is nothing configured within vCenter, no hosts, no clusters, nothing except backup. You can see that the amount of data transferred is the same in all tests. In regards to the duration, we’ve got the SMB protocol on the first place, followed by FTPS on the second, and NFS on the third place. Yes, I’m aware of “but there’s ftp:// and not ftps://”. I’ve configured FTPS as you can see later on the screenshots, but when I executed the backup job, it was logged as “ftp”. You can spot the difference at the port used for FTPS.
Configuring the different protocols for backup
A picture is worth a thousand words. Let’s not get too deep into that. Hopefully, you can see on the screenshot what I’ve configured for each protocol.

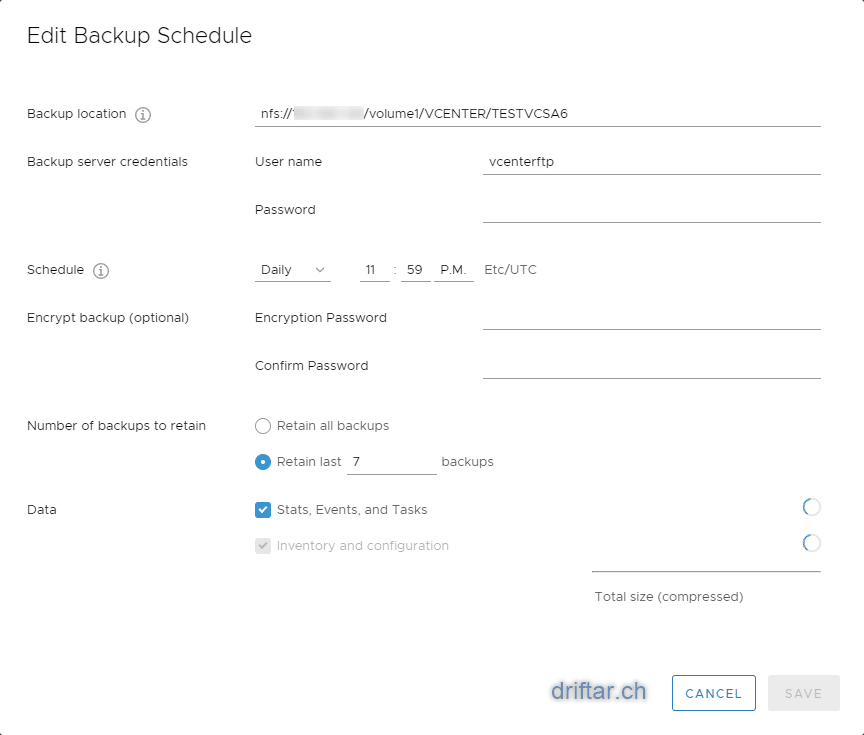


- SMB: Configure the VCSA backup with SMB, nothing special. Just enter “smb://” and the share path.
- NFS: Add “nfs://” as the protocol, and also add “/volume[x]” as you would mount any other NFS share.
- FTP: Similar to other protocols, just add “ftp://” as for the protocol, followed by the rest of the path.
- SCP: Similar to NFS, add “scp://” as the protocol as well as the port :22, and also the “/volume[x], followed by the rest of the path.
- FTPS: Similar to FTP, just add “ftps://” as for the protocol, and the port :990, followed by the rest of the path.
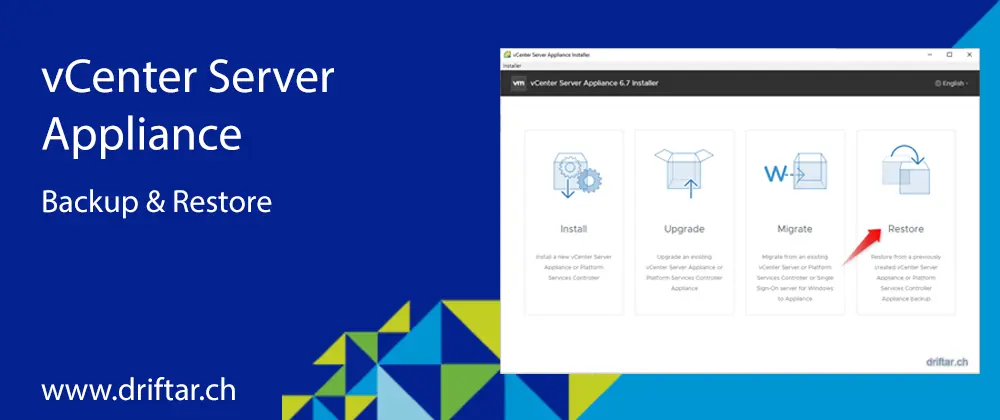
How to restore your vCenter?
Now, as we have a backup of our vCenter, which includes the database as well, we should be safe to restore it whenever needed. In my test scenario here, I need to restore my vCenter because I screwed up something. Let’s just assume that I screwed up so we can do a restore. Otherwise, the blog post would be already finished here.
In short, the restore process is divided into two steps:
- The first step will deploy a new appliance on your ESXi host
- The second step pushes the backed-up configuration to that new appliance
This guide will show you how to do this.
Preparation
First, download the ISO file for the VCSA setup from the VMware website and store it somewhere on your computer. You can now mount that ISO file, or just extract it to a folder of choice.
Next, locate the UI installer in the “vcsa-ui-installer\win32” subfolder. Double-click the “installer.exe” to launch the wizard.
Actual restore process
After launching the UI installer, click “Restore”, click next on the next screen.


Accept the terms of the license agreement and click Next.

This screen might be familiar somehow. Enter the backup location and the necessary credentials. Click Next.

On the next screen, you can browse the backup location and choose the backup file you like (or you need). Select the folder which suits you best, and then click Select.
Nice to know: folders starting with “M_” are manually created backups, folders starting with “S_” are scheduled backups.

Review the backup information to make sure you’re on the correct backup location and that you selected the correct backup. Click Next.

You already know that screen from the regular deployment. Enter the ESXi host details and necessary credentials.
The new appliance will be deployed on that ESXi host. Then click Next.

Click Yes to accept the host certificate.

You can’t take the same VM name for the restored appliance as for the currently running appliance. Also, set and confirm the root password, then click Next.

That screen should also be familiar. Choose the deployment size which fits your infrastructure. In my homelab, I’m driving along with a Tiny deployment. Click Next.

Select the datastore where the appliance should be placed. I’m driving here with my local homelab vSAN datastore. Click Next.
Nice to know: yes, it is possible and also supported to enable the thin disk mode. It’s not a problem for homelabs, as some have limited disk space available. But it might have some performance impact on production systems. So choose wisely. And then, click Next.

Check the network configuration. It should exactly match the current running vCenter server appliance because we’re doing a restore. Click Next.

One last time, check if you’re ready for stage 1. If not, go back to change the parameters. If you’re good to go, click Finish.

Als already mentioned above, in the first step, a new vCenter server appliance will be deployed. Just wait for that step to finish.

NOTICE: that error wasn’t planned. And in my opinion, it shouldn’t appear. We’ll see later why I’m thinking that…
At this stage, I had to power off the currently running VCSA and restart the restore wizard again. Thankfully, I didn’t have to fill out everything again, the stuff was stored, even when I closed the wizard.

Stage 1 has no completed. The new appliance has been deployed and is running so far in your environment. Click Continue to start with stage 2.
Nice to know: if you accidentally close the wizard, you can continue on the vCenter website (https://vcsa_url:5480/).

Just click Next.

The backup details are already pre-populated. If needed, enter the encryption password (if it has been set in the manual backup task or scheduled job in vCenter). Click Next.

As I’ve mentioned before, I had to shut down the running VCSA appliance before this step. I can’t remember that I did something wrong. And it was also just a fresh and clean VCSA which I just set up for these tests here.
But anyway, shut down the original VCSA appliance NOW to avoid network problems. If you’re done, click Finish.

Last warning… Click OK to move on.

Just wait for the wizard to complete stage 2.


If there’s a green checkmark, you’ve successfully restored your vCenter server appliance. Congratulations!
You can now close the wizard and access the vCenter web UI.

“This guide will show you how to configure all of the above protocols, except HTTP and HTTPS. I didn’t see a sense in setting up such a configuration in my lab, because it doesn’t seem to me as such backup targets would exist in a company either.”
Im sorry, you dont see how S3 compliant object storage over http(s) would be useful for backups?
Hi Tony,
Thanks for mentioning S3 compliant object storage! This would be indeed a possible backup target. To be honest, I don’t know if that is even supported by VMware, but that’s a different topic.
When I was writing this blog post, I didn’t have such storage in my homelab. Also, we didn’t have S3 storage at the company where I was working. And still, S3 compatible storage is not that widely spread in companies, at least not on-premises, I think. Talking cloud is a different thing. There, S3 compatible storage is a dime a dozen.
Best regards,
Karl