The last few days and weeks i was preparing for my VCP6-DCV exam. Well, i’m still preparing for it, there is ahelluva stuff to learn and understand. One thing is vSphere Auto Deploy.
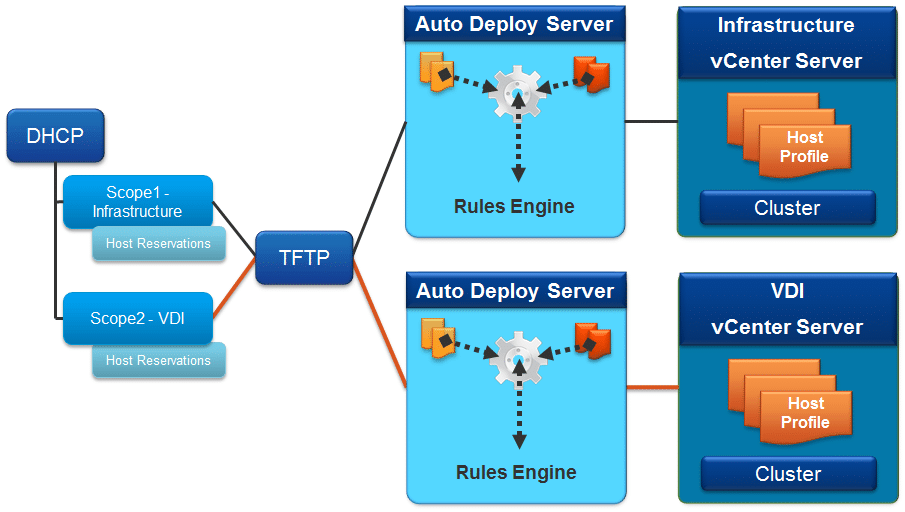
vSphere Auto Deploy is a cool feature for large infrastructures. Imagine, you just have to mount your ESXi hardware hosts in the racks, start them, and they are getting their software, setup and configuration via network. Without the need of any USB, CD or remote mounting of ISO files (like with HPE iLO or DELL iDRAC), and without any local storage if you boot your ESXi hosts from a shared datastore. Your host is online in just a few minutes and ready for use in your cluster, or whatever scenario you need it for.
Today i did some Auto Deploy stuff. And it is not that easy as i thought. You can’t do much via the vSphere Web Client (i’m absolutely the GUI type of sysadmin). You have to do some PowerCLI stuff, but not that much as i was afraid of. Let me show you how i did it. And please drop a comment if there is anything wrong, or if there is anything to make better. I’m pleased to update this post if necessary.
Stage 1 – Preparation for Auto Deploy
What do you need for using Auto Deploy? There is not much:
- vCenter (on Windows Server or the Appliance)
- PowerCLI
- a TFTP server (i used Open TFTP Server which worked very fine)
- ESXi Offline Bundle
- Probalby some hosts you want to setup with Auto Deploy
Let me give you some tips about the configuration for vCenter and the Open TFTP Server. With this piece of software i had to try and fail a few times until i’ve got it up and running.
vCenter configuration – Enable Auto Deploy
- Login to your vCenter with the Web Client.
- Click on “Administration“.
- Click on “System Configuration” and then “Services” on the next page.
- Click on “Auto Deploy“.
- In the toolbar on top, click “Actions” and then “Start“.
- Under “Actions” and “Edit Startup Type” you can configure Auto Deploy for a automatic or manual start.
vCenter configuration – download TFTP boot zip file
- Login to your vCenter with the Web Client.
- Click “vCenter Inventory Lists” and then click “vCenter Servers“.
- In this overview click your vCenter Server.
- Click on “Manage” then “Settings” and then “Auto Deploy“.
- Click on the link “Download TFTP Boot Zip” to download the file. You’ll need it later for the TFTP server.
Open TFPT Server – setup and configuration
- Download and install the Open TFTP Server (i’ll us this software in my configuration).
- Use the standard settings for installation.
- Navigate to the setup folder (e.g. C:\OpenTFTPServer) and open the “OpenTFTPServerMT.ini” with a text editor.
- You’ll need to configure the [HOME] parameters. This is the folder where you have to save the TFTP Boot Zip from above.
- Locate the [HOME] parameter, ignore all the text there and add just “C:\TFTP-Root” (or any other folder you’d like) after the last line of text in this part of the INI file. Add the path to the folder without quotation marks.
- Restart the Open TFTP Server service.
- Copy your “TFTP Boot Zip” file from above to the folder you added in the INI file and unpack it directly there. You should have now about 11 files, including the zip file.
- Restart the Open TFTP Server service again.
Configure DHCP server with options
You need to configure your DHCP server with two options so that your ESXi hosts can boot via network / PXE, get an IP address and configuration file.
- Add option 66, which is frequently called next-server. Add the IP address of your TFTP server as value.
- Add option 67, which is frequently called boot-file. Add undionly.kpxe.vmw-hardwired as value.
Stage 2 – Create depot, profiles and rules, and deployment
- Download the ESXi Offline Bundle from VMware and save it in a folder on the machine where you’re doing this stuff.
- Open PowerCLI and connect to your vCenter (Connect-VIServer).
- Add-EsxSoftwareDepot c:\tmp\update-from-esxi6.0-6.0_update02.zip.zip
- Add-EsxSoftwareDepot http://<vcenter server>/vSphere-HA-depot
- Find out which profiles are in this offline bundle with “Get-ESXImageProfile | fl * | out-file C:\tmp\profiles.txt“
- New-EsxImageProfile -CloneProfile “ESXi-6.0.0-20160302001-standard” -name “ESXiStatelessImage”
- Add-EsxSoftwarePackage -ImageProfile “ESXiStatelessImage” -SoftwarePackage vmware-fdm
- New-DeployRule -Name “FirstBoot” -Item “ESXiStatelessImage” -AllHosts
- Add-DeployRule -DeployRule “FirstBoot”
- Now boot one of your hosts. If everything is configured until this point you should see the ESXi image booting.
- Login to your vCenter with Web Client. You should probably see the new auto-deployed host in your inventory. In my lab this was the case.
- Configure this host (like networking, storage etc.) through web client.
- In the web client, create a new host profile based on this newly booted host named “ESXiAutoDeploy”.
- New-DeployRule -name “ProductionBoot” -item “ESXiStatelessImage”, ESXiAutoDeploy, <target_cluster> -Pattern “vendor=<unique hw identifier>”
- Add-DeployRule -DeployRule “ProductionBoot”
- Remove-DeployRule -DeployRule FirstBoot -delete
- Boot all of your auto deploy hosts.
- Assign the created host profile to these hosts.
- Reboot these hosts => aaaand you’re done.
- If you want to save the newly created image profile as a software depot, to make changes to a later time if needed, just do this:
- Export-EsxImageProfile -ImageProfile “ESXiStatelessImage” -ExportToBundle -FilePath c:\tmp\ESXiStatelessImage.zip
Conclusion
As i wrote above it is not that easy, but it was not so hard as i was afraid of. There are some things to consider, like ESXi configuration with correct networking, storage etc. to make later the suitable host profile which should fit all of your hosts. In this first try i didn’t create a big configuration, just some basic stuff to understand Auto Deploy and for the writing of this blog post.
I have to investigate the password policy, or better, how i can set a password policy. Because my test ESXi host did not have a root password after assigning the host profile. I know i configured the password in step 12 above beside the rest of the configuration. But the password didn’t come with the host profile. But anyway, the configuration of Auto Deploy worked. Now i’ve got some more tasks, for example to find out about this password issue.
Special thanks to Duncan Epping for his cheat sheet (no, i did not read his article, just his cheat sheet, but yes, i saw the link to his article). So i had the commands needed and a thin red line for orientation.
Also thanks to Vladan Seget for his article about some new features in vSphere 6.5 including Auto Deploy (which has now a GUI! How cool is that?)